|
The Planet Palette allows you to quickly locate planets,
moons, and certain comets. To open the Planet Palette, press
on the Planets button on the Tool Palette or select Planets
from the Window menu.
When the palette opens, you will see a list of the
planets. The palette dims the names of any planets that are
not currently above the horizon. This is a quick way for you
to discern which planets are "up" at the current time.
If you click on the small triangle to the left of most
planets, you reveal the moon(s) of the planet. Clicking on
the triangle again collapses the display to show you only
the parent object.
The positions in the sky of various objects (the Sun, the
planets and their moons) can be plotted as time passes with
respect to the local sky or to the stars in general (see
orbits and paths below).
Centering an Object
The simplest way to find a planet is to double-click on
its name. Starry Night will then center the planet in the
current field of view. If the object is currently beneath
the horizon, a dialog box will appear asking you if you'd
like to hide the horizon so you can see the planet.
The second way to center an object is to select the
planet in the Planet Palette, then press the Center Object
button (the one with the icon of a target on it).
You can also click on any object in the sky, and then
select Center Selection under the Edit menu.
You may also use popup menus to center an object. Please
see Contextual
Popup menus, in the Gathering Information chapter.
Locking on an Object
If you wish to find a planet, and keep it centered in the
window as time passes, select the planet's name in the
Planet Palette, then press the lock button. Starry Night
will take you to the object, and lock onto it. You can also
click beside the name of the object you want to lock on to,
just to the left of the Orbit column. This feature is very
useful if you want to track an object's movement over time.
See example below.
You can also click on any object in the sky, and then
select Lock On Selection under the Edit menu.
Displaying the Paths of Objects

Orbits
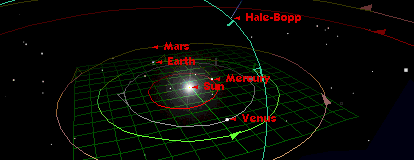
Starry Night gives you the ability to display an object's
orbit with just a click. Click in the Orbit column (the
first column to the right of the object). A check mark will
appear in the column and the planet's orbit will now be
displayed. Note that each planet has its own distinctive
orbit color.
If you are close enough, you may notice that the orbit is
marked with three indicators. The ascending node of the
orbit (the point at which the planet crosses up through the
ecliptic plane), is marked with a solid wedge. The
descending node of the orbit (the point at which the planet
crosses down through the ecliptic plane), is marked with a
hollow wedge. The point at which the orbit comes closest to
the parent body (the pericenter) is marked with a little
stick.
To turn off an orbit, click its check mark. To adjust how
orbits are displayed see Orbit and Path Options below.
Local Paths
A local path is the apparent path an object takes through
your local sky, that is, the trail an object would leave as
it moves along over time, as seen from your location. For
example, tracking the local path of the moon incorporates
the effects of Earth's rotation. To activate the local path,
click in the middle column, across from the object you want
to select.
Celestial Paths
A celestial path is the apparent path an objects makes on
the celestial sphere, that is, the trail an object leaves
over time, in relation to the fixed stars. To activate the
celestial path, click in the column to the far right of the
object you wish to select.
- Note: There is no local or
celestial path for an object that you are located on,
since that object doesn't move in relation to you.
- Tip: It is usually easiest to
see paths when the time step is running, or in realtime,
if you are zoomed up closely on the object.
Orbit and Path Options
You can adjust how orbits are displayed by selecting
Options from the Settings menu. Select Planets from the
popup list and then click on the Paths Folder. Here you can
adjust how planet paths are drawn. You can also instruct
Starry Night to display a circular marker or date at
intervals on the orbit. This feature is very handy if, for
example, you are plotting the celestial path of a comet and
want to know where it will be in the sky on certain
dates.
- Tip. You can turn off some or
all of these enhanced orbit features. You may wish to do
so if you have a slower computer, as these features take
a little longer to draw.
Example: The Retrograde Motion of Mars

|
